Gigabyte App Center – Control Your Motherboard from Windows
You just built a new PC with a Gigabyte motherboard. It is powerful, stable, and fast. But every time you want to adjust a fan curve, check a temperature, or update the BIOS, you have to restart your computer, mash the “Delete” key, and navigate a blue-and-gray BIOS menu. Wouldn’t it be easier to do all of that from your comfortable Windows desktop? Yes. That is exactly what the Gigabyte App Center offers.
The Gigabyte App Center is a free, all-in-one software suite designed specifically for Gigabyte motherboards. Instead of installing five separate tools for RGB lighting, fan control, overclocking, and driver updates, this utility bundles everything under one roof. It acts as a central hub for managing your PC’s hardware without ever touching the BIOS.
For PC enthusiasts, this convenience is a game-changer. You can monitor temperatures while gaming, adjust fan speeds to reduce noise, or apply an overclock profile with a single click. For beginners, it demystifies motherboard settings by presenting them in a familiar Windows interface rather than a intimidating text-based BIOS.
In this article, we will explore every feature of the Gigabyte App Center, walk through installation, discuss the pros and cons, and help you decide if this is the right motherboard management tool for your system.
Software Overview
The Gigabyte App Center is a free Windows utility developed by Gigabyte Technology for its lineup of motherboards (including AORUS, Gaming, and Ultra Durable series). The current version as of this writing is b22.0120.1, and it officially supports Windows 10 (with Windows 11 compatibility via the same installer).
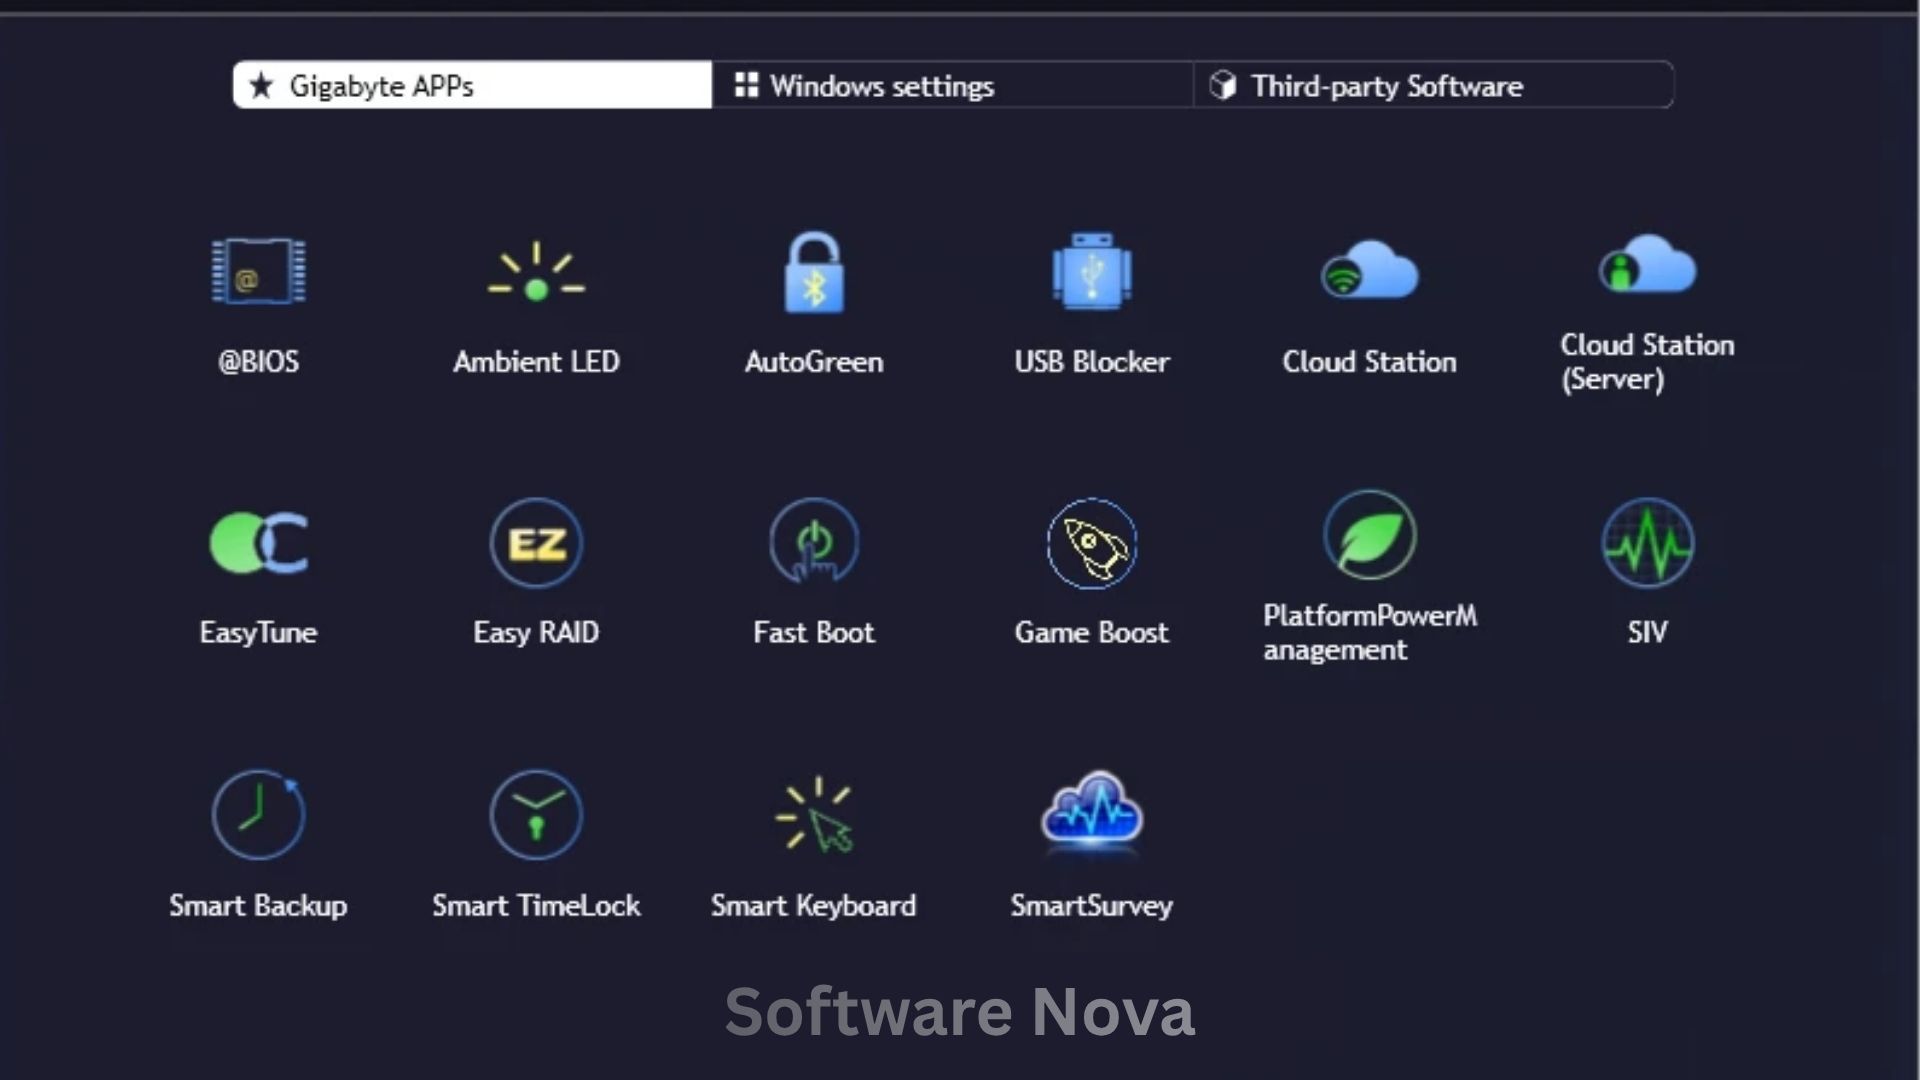
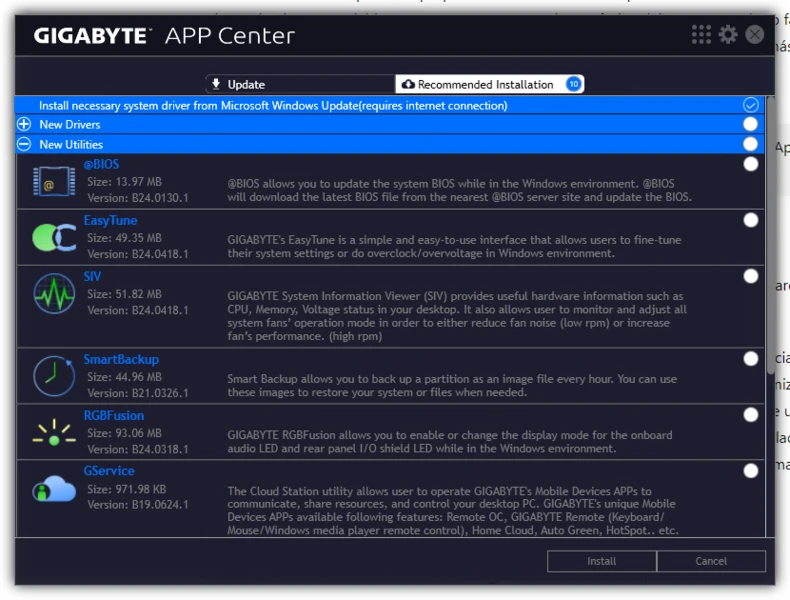
The App Center itself is not a single program. It is a launcher and manager for several smaller Gigabyte utilities. When you install the App Center, you get a dashboard that lets you download, launch, and update individual tools such as:
- EasyTune: For overclocking the CPU and memory.
- System Information Viewer (SIV): For monitoring temperatures, voltages, and fan speeds.
- RGB Fusion: For controlling motherboard and connected RGB lighting.
- BIOS Setup: For updating the BIOS from within Windows.
- @BIOS: A dedicated BIOS flashing tool.
- Smart Backup: For basic file backup and recovery.
- Cloud Station: For remote access and control (discontinued on newer boards but still present in some versions).
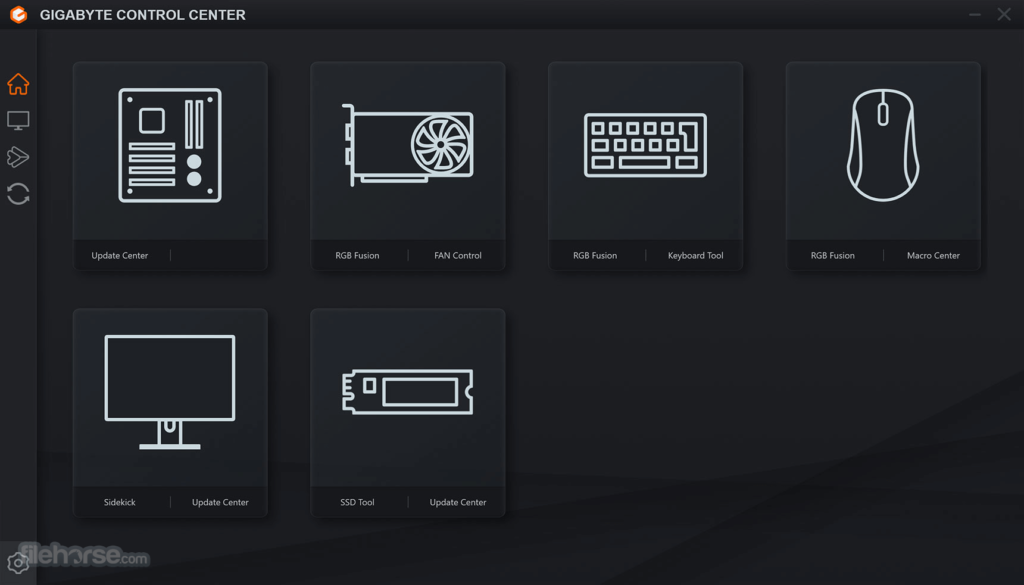
The central interface is clean and tile-based, similar to a smartphone home screen. You can rearrange the tiles, hide tools you never use, and check for updates to all components at once.
Because the App Center communicates directly with your motherboard’s embedded controller, it requires administrator privileges and runs background services. While this enables real-time monitoring, it also means the software is always active to some degree. For most users, the resource usage is minimal (under 100 MB of RAM). However, some users report that optional components can accumulate over time if not managed carefully.
Main Features with Detailed Descriptions
1. EasyTune: One-Click and Advanced Overclocking
EasyTune is the overclocking module within the App Center. It allows you to adjust your CPU’s clock speed, voltage, and memory timings directly from Windows.
For beginners: EasyTune offers “Auto Tuning” modes. The software will stress-test your system and automatically find a stable overclock. You can choose between:
- Quick Boost: Mild overclock that prioritizes stability.
- Easy Mode: A slightly more aggressive overclock.
- Advanced Mode: For experienced users who want manual control over multiplier, base clock (BCLK), and voltage.
For advanced users: You can save multiple profiles (e.g., “Gaming,” “Quiet,” “Stock”) and switch between them without rebooting. Real-time monitoring shows temperature and clock speeds so you can see the impact of your changes immediately.
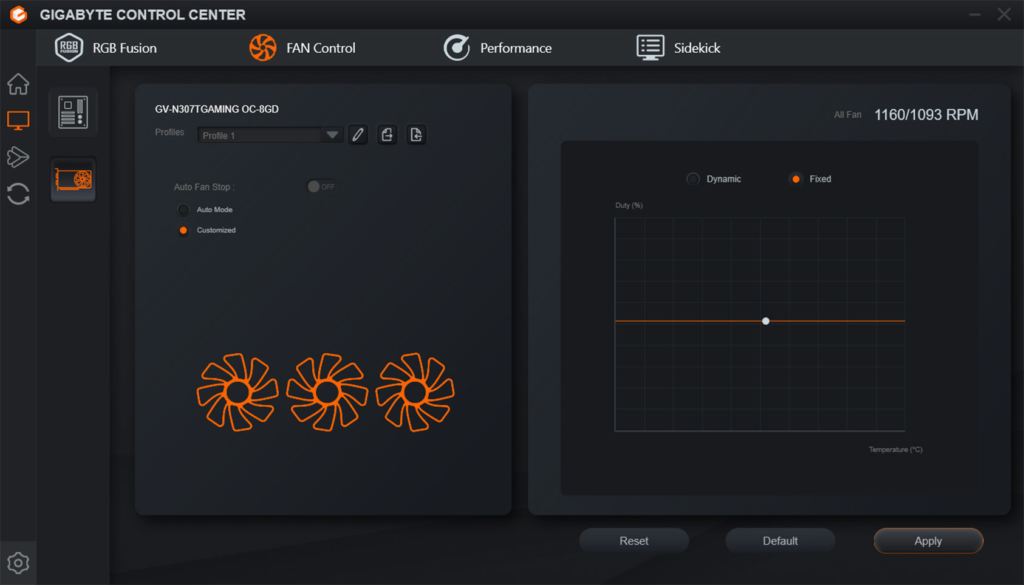
2. System Information Viewer (SIV): Fan Control and Monitoring
SIV is your hardware dashboard. It displays:
- CPU temperature and load.
- GPU temperature (if supported).
- System voltages (12V, 5V, 3.3V).
- Fan speeds (CPU, case, and optional water pump headers).
The most practical feature is the fan curve editor. Instead of relying on the BIOS’s limited preset curves (Silent, Normal, Full Speed), you can create custom curves. For example:
- Under 40°C: Fans at 20% (silent).
- At 60°C: Fans at 50%.
- At 80°C: Fans at 100%.
You can assign different curves to different fans (e.g., front intake fans vs. rear exhaust). The changes apply immediately without a restart. This is invaluable for balancing cooling performance and noise.
3. RGB Fusion: Synchronized Lighting Control
If your Gigabyte motherboard has RGB headers or built-in lighting, RGB Fusion is where you control it. You can:
- Choose from static, breathing, flashing, or color cycle effects.
- Set a specific color using a hex code or picker wheel.
- Sync lighting across RGB Fusion compatible components (some Gigabyte graphics cards, RAM, and peripherals).
- Turn off all RGB lighting completely (a popular feature for users who find lights distracting).
RGB Fusion supports both 12V RGB (4-pin) and 5V ARGB (3-pin) addressable headers. You can control each header independently. For example, set the CPU cooler to blue, the case fans to red, and the motherboard logo to off.
4. BIOS Update & @BIOS: Safe Firmware Flashing
Updating the BIOS traditionally involves downloading a file to a USB drive, rebooting, entering the BIOS, and running the Q-Flash utility. The App Center simplifies this.
Automatic BIOS Update: The App Center scans for the latest BIOS for your specific motherboard model. It downloads the file and can flash it directly from Windows. The system will restart once to complete the process.
@BIOS: For users who want more control, @BIOS lets you:
- Save your current BIOS to a file (backup).
- Flash a BIOS from a local file (e.g., a beta BIOS you downloaded).
- Flash from the internet (auto-download).
The @BIOS interface has a “Face-Wizard” feature (on older boards) that lets you change the BIOS splash screen image.
Safety note: Flashing the BIOS always carries a small risk. Ensure your PC has stable power (use a UPS if possible) and do not interrupt the process.
5. Smart Backup: Simple File Protection
This utility provides a basic backup solution for home users. You can:
- Select folders to back up (e.g., Documents, Desktop, Pictures).
- Choose a destination drive (external HDD or a second internal drive).
- Schedule backups (daily, weekly, or monthly).
- Restore individual files or entire folders from a backup.
Smart Backup is not a replacement for full system imaging software (like Macrium Reflect), but it is sufficient for protecting your documents from accidental deletion or a drive failure.
6. Driver and Utility Updater
One of the most appreciated features is the centralized update manager. Instead of visiting the Gigabyte website and searching for your motherboard model, the App Center scans your system and lists:
- New drivers for LAN, audio, chipset, and SATA.
- Updated versions of Gigabyte utilities (EasyTune, SIV, etc.).
- BIOS updates (as mentioned above).
You can select which updates to install and download them all at once. This saves significant time, especially after a clean Windows installation.
7. Platform Power Management (Optional)
On supported motherboards, the App Center includes power management tools that go beyond Windows’ built-in options. You can:
- Enable or disable ErP (energy-saving mode for peripherals).
- Set USB standby power (to charge devices when the PC is off).
- Control the behavior of the RGB lighting when the system sleeps.
These settings are usually buried in the BIOS, so having them in Windows is a convenience.
System Requirements
The Gigabyte App Center is not demanding, but it requires a compatible Gigabyte motherboard.
| Requirement Category | Minimum Specification |
|---|---|
| Operating System | Windows 10 (64-bit) or Windows 11 |
| Motherboard | Any recent Gigabyte or AORUS motherboard (Intel 300-series chipset or newer; AMD 400-series or newer) |
| Processor (CPU) | 1.5 GHz dual-core (any) |
| Memory (RAM) | 2 GB (4 GB recommended for heavy monitoring) |
| Storage Space | 500 MB for core software; additional for optional tools |
| Additional Software | .NET Framework 4.8 (installed automatically if missing) |
| Internet | Required for driver updates and BIOS downloads |
*Note: The App Center may partially work on older Gigabyte motherboards (e.g., Intel 100-series), but not all features will be available.*
How to Install Gigabyte App Center (Step-by-Step)
Installing the App Center is straightforward, but there are a few important choices to make during the process.
Step 1: Download the Installer
Go to a trusted download page (such as your website or CNET). Click the “Download Now” button. Save the file (usually Gigabyte_App_Center_Setup.exe) to your “Downloads” folder.
Step 2: Close Other Programs
Close any hardware monitoring tools (HWMonitor, MSI Afterburner) or overclocking software. They may conflict with the installer.
Step 3: Run the Installer as Administrator
Right-click the downloaded file and select “Run as Administrator.” This is required for the installer to access hardware-level components.
Step 4: Allow User Account Control
Windows will ask, “Do you want to allow this app to make changes?” Click “Yes.”
Step 5: Choose Installation Language
Select your preferred language (typically English). Click “OK.”
Step 6: Accept the License Agreement
Read the agreement (standard Gigabyte terms). Check “I accept the agreement.” Click “Next.”
Step 7: Select Components (Important)
This is the most critical step. The installer will list all optional tools. By default, everything is checked. You should uncheck any tools you do not need to avoid bloat.
Recommended selections for most users:
- App Center (required): Keep checked.
- EasyTune: Check if you plan to overclock.
- System Information Viewer (SIV): Check for fan control and monitoring.
- RGB Fusion: Check if you have RGB lighting.
- Smart Backup: Optional (uncheck if you use other backup software).
- Cloud Station: Uncheck (discontinued on modern boards, rarely used).
- USB Blocker: Uncheck (only for business/office environments).
Click “Next.”
Step 8: Choose Installation Folder
Keep the default folder (C:\Program Files\Gigabyte\App Center). Click “Next.”
Step 9: Install
Click “Install.” The installation will take 1-2 minutes. You may see command prompt windows flash briefly as services register.
Step 10: Restart Your Computer
When prompted, select “Yes, restart the computer now.” A restart is required for the background services to start correctly.
Step 11: Launch App Center
After restarting, double-click the “App Center” icon on your desktop or in the Start Menu. The main dashboard will load.
Step 12: Check for Updates
Inside the App Center, click the “Settings” (gear) icon or “Live Update.” Let it scan for any newer versions of the installed utilities. Download and install any updates.
Pros and Cons Table
The Gigabyte App Center is useful but not perfect. Here is an honest evaluation.
| Pros (Advantages) | Cons (Disadvantages) |
|---|---|
| Centralized control: One app for BIOS, fans, RGB, and overclocking. | Windows 10 only (officially): No official Windows 7 or 8 support. |
| Free for Gigabyte owners: No cost, no subscription. | Optional bloat: Installer includes many tools you may never use. |
| User-friendly interface: Tile-based dashboard is approachable. | Background services: Always-running processes use some RAM (50-100 MB). |
| Easy BIOS updates: Flash from Windows without a USB drive. | Occasional bugs: Some users report crashes or freezes, especially on new board launches. |
| Custom fan curves: Much more flexible than BIOS presets. | RGB Fusion limitations: Syncing with non-Gigabyte devices (e.g., Corsair RAM) is difficult. |
| Centralized driver updates: No more searching the support website. | Uninstall is messy: Removing the App Center may leave leftover services. |
| Real-time monitoring: View temperatures and voltages while gaming. | No macOS or Linux support: Windows only. |
Practical Use Cases and Benefits
Use Case 1: The Noise-Sensitive Gamer
Scenario: Your gaming PC sounds like a jet engine when playing demanding games, even when the CPU is cool. You want quieter operation.
Benefit: You open System Information Viewer (SIV) in the App Center. You create a custom fan curve: fans stay at 20% until the CPU hits 65°C. Now, your PC is silent during web browsing and light gaming, only ramping up when truly needed. No BIOS reboot required.
Use Case 2: The RGB Enthusiast
Scenario: You have a Gigabyte motherboard, Gigabyte graphics card, and third-party RGB fans all plugged into the motherboard headers. You want a unified “breathing” effect.
Benefit: You open RGB Fusion. You assign each motherboard header a color (e.g., Header 1 = fans, Header 2 = GPU support bracket). You select a “breathing” effect at 2-second intervals. All lights now breathe in sync, transforming your PC’s appearance in seconds.
Use Case 3: The Overclocking Beginner
Scenario: You bought a “K” series Intel CPU (e.g., 13600K) and a Z-series Gigabyte motherboard, but you have never overclocked before. The BIOS looks scary.
Benefit: You open EasyTune. You click the “Quick Boost” button. The software automatically applies a safe, tested overclock. Your CPU now runs 10% faster. You gained free performance without touching a single voltage setting.
Use Case 4: The System Builder Preparing a PC for a Friend
Scenario: You built a PC for a non-technical friend. You want to ensure they can keep drivers and the BIOS updated without calling you every month.
Benefit: You install the App Center and show your friend the “Live Update” tab. You tell them: “Once a month, open this, click ‘Scan,’ and then ‘Install.’ That’s it.” Your friend can now maintain their own PC.
Use Case 5: The Troubleshooter Diagnosing Overheating
Scenario: Your computer is shutting down randomly under load. You suspect overheating but are not sure which component is the culprit.
Benefit: You open System Information Viewer. You leave it running on a second monitor. When the shutdown happens, the recorded max temperatures show your CPU hit 95°C. You now know the CPU cooler is the problem, not the power supply or GPU.
Frequently Asked Questions (FAQ)
Q1: Is Gigabyte App Center necessary for my motherboard to work?
No. Your Gigabyte motherboard will work perfectly fine without the App Center. Windows includes basic drivers that handle normal operation. The App Center is an optional convenience for users who want to monitor, overclock, control RGB, or update drivers from within Windows. If you never open the BIOS and do not care about RGB, you do not need it.
Q2: Why does the installer try to install so many programs? Can I decline them?
Yes. During the installation (Step 7 in our guide), the installer lists every optional tool. By default, all boxes are checked. You must manually uncheck the tools you do not want. For example, if you never use backup software, uncheck “Smart Backup.” If you do not have a Gigabyte graphics card, uncheck “VGA Tool.” This prevents bloat. Many user complaints about “bloatware” come from clicking “Next” without reading.
Q3: Does App Center work on Windows 11?
Officially, the CNET specifications list Windows 10 only. However, thousands of users run the App Center on Windows 11 without issues. The Windows 11 driver model is very similar to Windows 10. If you encounter problems, try installing the App Center in Windows 10 compatibility mode (right-click installer > Properties > Compatibility > Run this program in compatibility mode for Windows 10). Gigabyte will likely release an official Windows 11 version in a future update.
Q4: How do I uninstall the App Center completely?
Because it includes multiple services, a standard uninstall from “Apps & features” may leave leftovers. For a clean removal:
- Uninstall each tool individually: Go to Settings > Apps > Installed apps. Uninstall “Gigabyte App Center,” then “EasyTune,” then “System Information Viewer,” etc.
- Restart your PC.
- Check for leftover services: Press Win + R, type
services.msc, and look for anything named “Gigabyte” or “GService.” If found, stop them and set startup to “Disabled.” - Delete leftover folders: Check
C:\Program Files\GigabyteandC:\ProgramData\Gigabyte. Delete them if present. - Reboot again.
Q5: Why is RGB Fusion not detecting my RAM or fans?
RGB Fusion only controls devices connected directly to Gigabyte motherboard headers (RGB/ARGB). It does not control:
- RAM with RGB (unless the RAM brand specifically supports Gigabyte Fusion, e.g., some TeamGroup or ADATA models).
- USB-connected devices (e.g., Corsair AIO coolers, NZXT accessories).
- Peripherals (keyboard, mouse) unless they have a direct ARGB cable to the motherboard.
For those devices, use their manufacturer’s software (e.g., Corsair iCUE, Razer Synapse).
Q6: Can I use App Center on a non-Gigabyte motherboard?
No. The App Center detects the motherboard’s vendor ID. If it does not see “GIGABYTE” as the manufacturer, it will either fail to install or crash on launch. It is strictly for Gigabyte and AORUS brand motherboards.
Q7: The App Center says “Motherboard not supported.” Why?
Your motherboard is either:
- Too old (pre-2016, e.g., Intel 100-series chipsets or older). Gigabyte dropped support for older boards.
- Too new (a just-released model). The App Center may need an update. Check Gigabyte’s website for the latest version.
- A server or workstation board (not designed for App Center).
Check your motherboard’s support page on Gigabyte.com. If the App Center is not listed under “Utilities,” it is not supported.
Q8: Does App Center affect gaming performance?
The background services use minimal CPU (less than 1%) and about 50-100 MB of RAM. This is negligible on any modern gaming PC with 16 GB or more of RAM. However, if you use the on-screen display feature in System Information Viewer to show temperatures while gaming, there is a tiny performance hit (1-2% FPS). You can disable the overlay if you need every last frame.
Q9: Why is my fan curve not being applied after a restart?
The App Center must be running (in the system tray) for custom fan curves to remain active. By default, it launches on startup. Check that:
- The App Center is not blocked by your antivirus.
- The “Launch on startup” option is enabled in App Center settings.
- You saved the fan curve profile (click “Save” in SIV, not just “Apply”).
If you uninstall the App Center, the fans will revert to your BIOS settings (usually a “Normal” curve).
Q10: Can I update my BIOS using App Center if my system is unstable?
No. If your system is crashing or unstable, do not use the Windows-based BIOS update. A crash during a BIOS flash can permanently damage the motherboard. For unstable systems, use the traditional method: download the BIOS to a USB drive, restart, enter the BIOS (F2 or Del key), and use Q-Flash. This method does not rely on Windows at all. Use App Center for BIOS updates only when your system is stable.
Conclusion
The Gigabyte App Center is a powerful, free, and convenient tool for anyone with a modern Gigabyte motherboard. It successfully brings BIOS-level controls into the Windows environment, saving you from constant reboots and confusing text menus. For fan curve enthusiasts, RGB tinkerers, and overclocking beginners, it is a genuine productivity boost.
That said, the software is not perfect. The installer tries to bundle optional tools that many users do not need, leading to complaints about bloat. The background services, while lightweight, add some overhead. And the Windows 10-only official support may worry Windows 11 users, even though it generally works.
The key to a good experience with App Center is selective installation. Install only the modules you will actually use (EasyTune, SIV, RGB Fusion). Uncheck the rest. Keep the software updated via Live Update. If you follow these practices, you will likely find the App Center to be a valuable addition to your system.
Should you install it? If you are a PC enthusiast who wants fine-grained hardware control without living in the BIOS, yes. If you are a casual user who never overclocks and keeps the case closed, you can safely skip it. Your motherboard will run fine either way.
For everyone in between—the gamers, the streamers, the PC builders—the Gigabyte App Center offers a free and functional dashboard that puts you in control. Download it, install selectively, and enjoy managing your PC your way.