Image Composite – The Free Panorama Powerhouse
Have you ever stood at the edge of a breathtaking canyon or in the middle of a bustling city square, wishing your camera could capture the entire scene in one shot? You take multiple overlapping photos, hoping to later combine them. But when you try, the results look terrible—visible seams, mismatched exposures, and distorted perspectives.
This is exactly where Image Composite Editor (ICE) 64-Bit comes to the rescue. Developed by Microsoft Research, ICE is a free, professional-grade photo stitching application for Windows. It takes your series of overlapping images and automatically blends them into a single, seamless, high-resolution panorama. Whether you are working with three photos or three hundred, ICE handles the complex alignment and blending so you don’t have to.
What makes ICE truly special is its ability to create gigapixel images—massive panoramas containing billions of pixels. It also supports advanced projection modes like spherical and stereographic, allowing you to create 360-degree views or artistic “tiny planet” effects.
In this article, we will explore everything you need to know about Image Composite Editor. You will learn about its core features, system requirements, how to install it, and step-by-step instructions for creating your first panorama. We will also discuss the pros and cons based on user experiences and real-world testing. By the end, you will know if ICE is the right photo stitching tool for your Windows PC.
Software Overview
Image Composite Editor (ICE) is a freeware application created by Microsoft Research’s Computational Photography Group. Unlike commercial panorama tools that can cost hundreds of dollars, ICE is completely free for personal and commercial use. No watermarks, no trial periods, no hidden fees.
The software is designed specifically for 64-bit versions of Windows. This is important because 64-bit architecture allows ICE to access more than 4GB of RAM. When you are stitching dozens of high-resolution RAW images into a gigapixel panorama, memory becomes critical. The 64-bit version can handle massive files without crashing or slowing down.
ICE automates nearly the entire stitching process. You simply:
- Load your source images (JPEG, TIFF, PNG, BMP, or even RAW formats).
- Choose a projection mode (automatic selection works well for most cases).
- Click “Stitch” and wait for the software to align, blend, and crop the images.
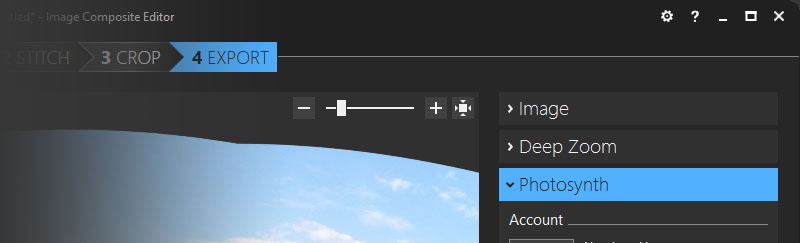
Behind the scenes, ICE uses advanced algorithms to identify common features across your photos, correct for lens distortion and exposure differences, and create a seamless composite. The final output can be saved as a standard image file (JPEG, TIFF, PNG) or exported to specialized formats like Deep Zoom (for online gigapixel viewing) or Photosynth (Microsoft’s now-discontinued 3D environment).
The interface is functional but dated. It looks like a Windows 7-era application. However, the simplicity is deliberate: ICE focuses on doing one thing (stitching) exceptionally well, rather than trying to replace Photoshop.
It is worth noting that Microsoft no longer actively develops ICE. The latest version (2.0.3) was released in 2015, with only minor bug fixes since then. Despite its age, it remains one of the most powerful and reliable free panorama stitchers available, even on Windows 10 and Windows 11.
Main Features Explained in Detail
1. Automatic Image Alignment and Stitching
ICE’s core engine is its ability to automatically align overlapping images—even when they were taken handheld (without a tripod). The software analyzes each photo, identifies hundreds of “feature points” (corners, edges, textures), and matches these points across adjacent images. It then calculates how to transform, rotate, and scale each image so they line up perfectly.
This process works even when:
- Images have different exposure levels (ICE corrects brightness differences).
- There is parallax error (when the camera moves between shots).
- Some images contain moving objects (people, cars) that appear in only one frame.
For the vast majority of panorama attempts, the automatic stitching succeeds without any manual intervention. Users consistently praise the “flawless” and “seamless” results.
2. Multiple Advanced Projection Modes
A panorama is not simply a straight line of images. Depending on the scene, you need different “projections” to avoid distortion. ICE offers five projection modes:
- Automatic (Recommended): ICE analyzes your images and chooses the best projection automatically.
- Planar (Flat): Best for narrow panoramas or scenes with a flat field of view (like a mural or building facade). Straight lines remain straight.
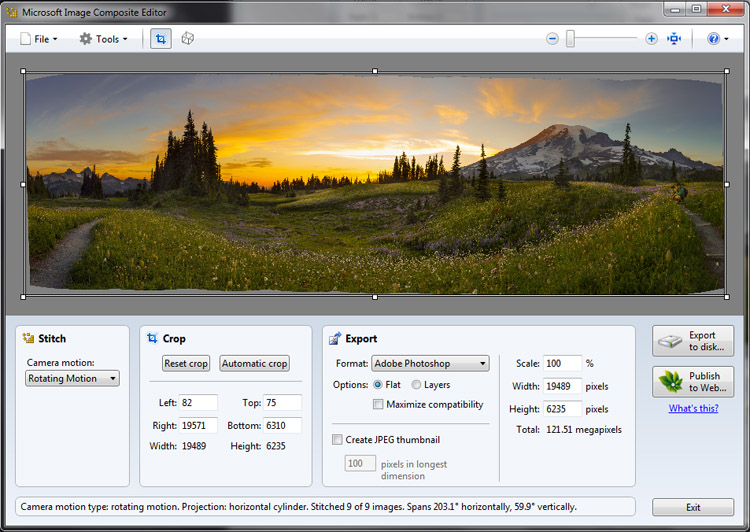
- Cylindrical: Ideal for wide horizontal panoramas. The scene is mapped onto a cylinder, reducing distortion at the edges. This is the default for most landscape panoramas.
- Spherical: Used for 360-degree x 180-degree panoramas (full surround). The image is mapped onto a sphere. Perfect for virtual tours or capturing an entire room.
- Stereographic: Creates a circular “tiny planet” or “fisheye” effect. When you take a full 360-degree spherical panorama and apply stereographic projection, the result looks like a small planet floating in space.
The availability of spherical and stereographic projections sets ICE apart from basic free stitchers. These modes are usually found only in expensive professional software.
3. Gigapixel Image Creation
A gigapixel image contains over one billion pixels. To put that in perspective, a standard 4K photo is about 8 megapixels (8 million pixels). A gigapixel image is 125 times larger. Creating such a file requires stitching hundreds of high-resolution photos.
ICE can handle this scale. The 64-bit version can use all available RAM and multiple CPU cores. Users have reported successfully stitching 200+ images from a DSLR into a single, zoomable gigapixel panorama. The resulting file can be saved as a multi-resolution Deep Zoom format, which allows viewers to pan and zoom online without downloading the entire massive file.
4. Exposure Blending and Color Correction
When you take multiple photos, lighting conditions often change. One image might be slightly brighter or have a different white balance. If you simply overlay them, the seams will be obvious.
ICE performs exposure blending. It analyzes the overlapping regions and smoothly transitions from one image’s brightness to the next. The software also attempts to balance colors across the entire panorama. While not as powerful as manual color grading in Lightroom, the automatic blending is sufficient for most users.
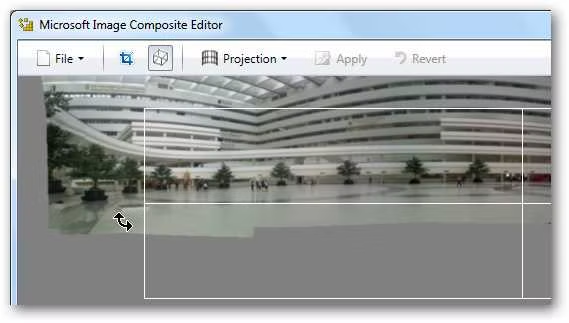
5. Cropping to Remove Irregular Edges
After stitching, the resulting panorama rarely has straight edges. Because the images were transformed and rotated, the composite often looks like a wavy blob with transparent corners.
ICE includes an automatic cropping tool that detects the largest rectangular area within the stitched image containing actual photo data. It then crops away the irregular transparent borders. You can also adjust the crop manually or choose to keep the full, uncropped image (which you can later edit in Photoshop).
6. Support for Various Input and Output Formats
Input formats: ICE accepts JPEG, TIFF, PNG, BMP, GIF, and many RAW formats (if your system has the appropriate codecs). You can mix different formats in the same panorama (e.g., JPEG and TIFF together).
Output formats: You can export to JPEG (with adjustable quality), TIFF (lossless, best for printing), PNG, BMP, or the specialized Deep Zoom format (multiple files for web viewing). ICE can also export camera projection parameters for use in 3D applications.
7. Command-Line Interface for Automation
Advanced users can run ICE from the command line. This allows you to automate stitching tasks—for example, processing a folder of panoramas overnight or integrating ICE into a larger image processing pipeline. The command-line options control input files, output location, projection type, and cropping.
System Requirements
Image Composite Editor 64-bit is lightweight in terms of disk space but requires a reasonably modern computer for large panoramas.
| Component | Minimum Requirement | Recommended |
|---|---|---|
| Operating System | Windows 7, Windows 8, Windows 10 | Windows 10 or Windows 11 (64-bit) |
| Legacy OS Support | Windows Vista, Windows XP, Windows 2000/2003 | Not recommended |
| Processor | 1.5 GHz dual-core | 3.0 GHz quad-core or better |
| RAM | 2 GB | 8 GB or more (for gigapixel images) |
| Hard Disk Space | 100 MB free | 500 MB free (plus temp space for large stitches) |
| Graphics | DirectX 9.0c compatible | Dedicated GPU with 1GB VRAM (optional, for faster rendering) |
| Display Resolution | 1024 x 768 | 1920 x 1080 or higher |
Important Notes:
- This is the 64-bit version. It will not install on 32-bit Windows. Check your system type (Control Panel > System > System type) before downloading.
- For large gigapixel stitches (100+ images), 16GB+ RAM is strongly recommended.
- ICE is not actively updated, but it runs on Windows 11 without issues.
How to Install Image Composite Editor 64-Bit (Step-by-Step)
Follow these steps to install ICE on your Windows PC. The process is quick and straightforward.
- Download the installer
Go to the official CNET Download page for Image Composite Editor (64-Bit). Click the “Download” button. Save the file (e.g.,ICE-x64.msi) to your computer. The file is around 15-20 MB. - Verify your Windows version
Before running the installer, confirm that you have a 64-bit version of Windows. Right-click “This PC” or “Computer” on your desktop or Start menu, select “Properties,” and look for “System type: 64-bit Operating System.” If you see “32-bit,” you need the 32-bit version of ICE (not covered here). - Run the installer
Double-click the downloaded.msifile. If Windows asks “Do you want to allow this app to make changes?” click “Yes.” - Welcome screen
The setup wizard will open. Click “Next.” - License agreement
Read the Microsoft Software License Terms. Select “I accept the terms in the License Agreement” and click “Next.” - Choose destination folder
Select where you want to install ICE. The default folder (C:\Program Files\Microsoft Research\Image Composite Editor) is recommended. Click “Next.” - Ready to install
Click “Install” to begin the installation. The process typically takes less than 30 seconds. - Complete installation
When the installation finishes, click “Finish.” You may leave “Launch Image Composite Editor” checked to open the software immediately. - First launch
If you didn’t launch automatically, find Image Composite Editor in your Start menu (look under “Microsoft Research”). Open it. - Ready to stitch
You will see the main interface: a blank window with a toolbar. Click “New Panorama” to begin selecting images. You are now ready to create your first composite.
Pros and Cons
Based on user reviews (4.3/5 from 6 votes on CNET, plus extensive online community feedback) and technical analysis, here is an honest assessment of Image Composite Editor.
| Pros ✅ | Cons ❌ |
|---|---|
| Completely free, no watermarks or ads | No longer actively developed by Microsoft |
| Exceptional, automatic stitching quality | Outdated interface (Windows 7 era) |
| Supports gigapixel images (billions of pixels) | Limited manual control for problem images |
| Advanced projection modes (spherical, stereographic) | Basic post-stitching editing tools |
| 64-bit version can use large amounts of RAM | Some users report pixelation or compression issues |
| Handles hundreds of images in one panorama | No built-in lens correction profiles |
| Exposure blending and color balancing | Occasional crashes with extremely large files |
| Outputs to Deep Zoom for online gigapixel viewing | No native support for newer RAW formats (requires codecs) |
| Command-line interface for automation | Cropping tool is basic (no freeform edge) |
| Works on Windows 11 despite being older software | Not updated for high-DPI displays (interface can be small) |
Practical Use Cases and Benefits
1. Landscape Photography
You are hiking in the mountains. The valley view is too wide for your lens. You take 10 overlapping photos from left to right. Back at your computer, you load them into ICE, click “Stitch,” and within a minute you have a breathtaking, high-resolution panorama that captures the entire scene. No visible seams, no mismatched exposures. You can then print the result as a large wall art.
2. Real Estate Virtual Tours
A real estate agent needs to show a full room—floor to ceiling, wall to wall. Using a tripod, they take a series of photos covering the entire space (including up and down). In ICE, they choose spherical projection, stitch the images, and export as a Deep Zoom file. This file can be uploaded to a website, allowing potential buyers to pan and zoom around the room interactively.
3. Architectural Documentation
An architect needs to document a large building facade. The street is too narrow to capture the whole building in one shot. They take 20 overlapping photos while walking along the opposite sidewalk. ICE stitches them into a single, distortion-corrected image. The architect can then measure proportions or overlay design drawings.
4. “Tiny Planet” Social Media Art
A photographer wants a creative, viral-worthy image. They take a full 360-degree spherical panorama (or use an action camera in 360 mode). They load the images into ICE, select stereographic projection, and the software creates a circular “tiny planet” where the ground wraps around and the sky forms a surrounding ring. This is perfect for Instagram or Facebook.
5. Gigapixel Science or Cultural Heritage
Museums and research institutions use ICE to create gigapixel images of paintings, fossils, or historical documents. For example, stitching 400 macro photos of a large painting creates a digital copy so detailed that viewers can zoom in to see individual brushstrokes or cracks. This aids preservation and online education.
6. Event Photography Group Shots
You are the photographer at a large wedding. The entire guest list (200 people) cannot fit into one photo. You take three overlapping rows of photos while the group stands in a semicircle. ICE stitches them into one ultra-wide group photo. Every face is visible and in focus.

Frequently Asked Questions (FAQ)
1. Is Image Composite Editor really free? Are there any hidden costs?
Yes, ICE is completely free for all users, including commercial use. There are no watermarks, no trial periods, no nag screens, and no hidden fees. It was released as a free research project by Microsoft and remains free. You do not need to register or provide any payment information.
2. Why does my stitched image look pixelated or compressed when zoomed in?
Some users (like reviewer “smack30083”) have reported that the final image appears fuzzy. This usually happens due to one of two reasons:
- Output quality setting: When saving as JPEG, ensure the quality slider is set to 100% (or close to it). Lower quality introduces compression artifacts.
- Input image resolution: If your source images are low resolution (e.g., from a smartphone camera or heavily compressed), the panorama will also be low resolution. Use the highest quality settings on your camera (RAW or fine JPEG).
- Auto-cropping: The automatic crop may trim too much, leaving a small image. Manually adjust the crop or choose “Keep full panorama” and then crop in another editor.
To get print-quality results, save as TIFF (lossless) and ensure your source images are high-resolution.
3. Can ICE stitch RAW files directly from my camera?
ICE can stitch RAW files if your Windows system has the necessary codecs installed. For most users, the easiest method is to convert your RAW files to high-quality JPEG or 16-bit TIFF first (using software like Adobe Lightroom, Canon DPP, or the free IrfanView). Then, import those converted files into ICE. This gives you more control over exposure and color before stitching.
4. What is the maximum number of images ICE can stitch?
There is no hard-coded limit. The practical maximum depends on your computer’s RAM and the resolution of each image. For a typical 16GB RAM system, ICE can comfortably handle 100–200 high-resolution DSLR images (24 megapixels each). For gigapixel projects with 500+ images, you may need 32GB or 64GB of RAM. The 64-bit version can theoretically address terabytes of memory, limited only by your hardware.
5. Why does ICE sometimes crash or freeze?
Crashes usually happen during very large stitches when the computer runs out of memory. To reduce crashes:
- Close other programs (especially web browsers) before stitching.
- If stitching more than 50 images, save your project periodically (File > Save Project).
- Try stitching in sections: create left and right halves, then stitch those two results together.
- Ensure you have the latest graphics drivers (though ICE is old, up-to-date drivers rarely cause issues).
Also note that ICE is no longer updated, so very new CPU architectures (Intel 13th/14th gen) are untested. Most users report success.
6. Does ICE work on Windows 11?
Yes. Although ICE was last updated in 2015, many users have successfully installed and run it on Windows 10 and Windows 11. No special compatibility settings are required. Simply download the 64-bit MSI installer and run it normally. The interface looks small on high-DPI screens, but the functionality remains intact.
7. Can I manually adjust control points if the automatic stitching fails?
This is one of ICE’s limitations. Unlike advanced tools like PTGui or Hugin, ICE offers no manual control point editor. If the automatic stitching fails (rare, but possible with very low-texture scenes like a clear blue sky), you cannot manually tell ICE which points to align. In such cases, you would need to use a different stitcher. For 95%+ of typical panoramas (landscapes, buildings, events), automatic stitching works perfectly.
8. How do I create a “tiny planet” image?
- Capture a full 360-degree spherical panorama. This requires taking enough photos to cover every direction: horizontal 360 degrees plus straight up and straight down. A 360-degree camera or a carefully rotated DSLR on a pano head works best.
- Load all images into ICE.
- Under the “Projection” dropdown, select Stereographic.
- Click “Stitch.”
- The result will be a circular image where the ground wraps into the center and the sky becomes the outer ring. Crop away any black edges.
- Export as JPEG or TIFF. You can then rotate the image in any photo editor to position the “planet” as desired.
Conclusion
Image Composite Editor (64-Bit) is a rare gem in the world of free software: a professional-grade tool that rivals commercial products costing $100 or more. Developed by Microsoft Research, it automates the complex process of panorama stitching with remarkable accuracy. Whether you are a landscape photographer, a real estate agent, a museum archivist, or a casual user wanting to merge family vacation photos, ICE delivers seamless, high-quality results.
The software’s strengths are undeniable. Its stitching engine is among the best available, handling exposure differences, moving objects, and handheld camera shakes without complaint. Support for gigapixel images and advanced projections (spherical, stereographic) opens creative and technical possibilities that most free tools cannot touch. And of course, the price (free) is unbeatable.
However, ICE is not perfect. The interface feels dated, looking like a leftover from Windows 7. There is almost no manual control—if the automatic alignment fails, you cannot tweak it. Post-stitching editing is basic; you will need Photoshop or GIMP for color grading, sharpening, or advanced cropping. And because Microsoft no longer updates ICE, users on very new hardware may encounter minor quirks (though most report smooth sailing).
So, who should download Image Composite Editor 64-Bit?
- Yes: Photographers, real estate agents, architects, museum staff, and hobbyists who need to stitch multiple photos into wide panoramas or 360-degree views.
- Maybe: Professional printers requiring extremely high-resolution output; you may need to test ICE against your specific RAW workflow.
- No: Users who need manual control over stitch points, or those who prefer a modern, actively-developed interface.
If you fall into the “yes” category, ICE is an essential addition to your Windows software library. It respects your time (automation), your budget (free), and your creative ambitions (gigapixel + spherical projection). Download it, try it with your own photos, and prepare to be impressed by what a free Microsoft Research tool can achieve.